Notiz
Lab 2: How To Acquire Data Using Linux

Goals
- Prepare an evidence storage environment
- Use Linux to prepare forensic images
- Hash files and drives for validation
- Bonus: copy forensic images to CD/DVDs
What you will learn
- How to prepare the evidence storage (target) environment to store evidence
- How to organize your evidence storage
- How to use different Linux tools to create forensic images
- How to hash files and drives and why
- How to compress and split forensic images to be stored on CD/DVD drives
To guide you throughout the lab process, you will find different Tasks. Tasks are designed for educational purposes, as well as to show you the usage of different tools and different methods to achieve the same goal. Please note that Tasks are not meant to be used as a methodology.
Armed with the knowledge acquired from the content and the skills acquired from the Task(s), you can achieve the Lab goal. If this is the first time doing a lab, we advise that you follow these Tasks.
Once you have completed all Tasks, you can proceed to the end of the lab manual and check the solutions.
Recommended tools
- Virtualbox
- Linux operating system with dd
- Different Linux CLI Commands
- The dcfldd tool
Solutions:
Prepare an evidence storage environment To prepare an evidence storage, we must configure a storage within a virtual-box as:
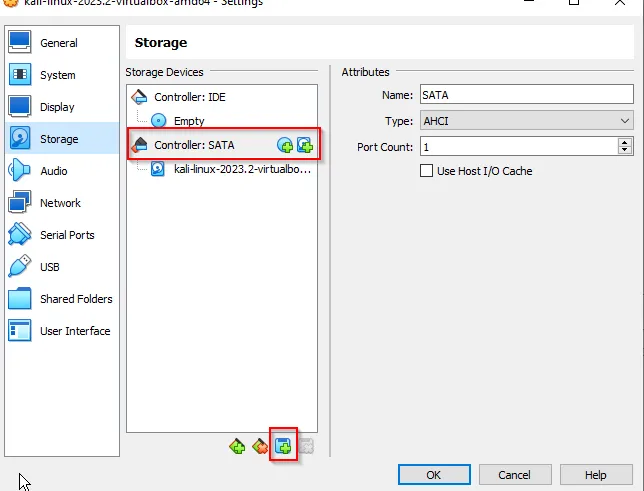
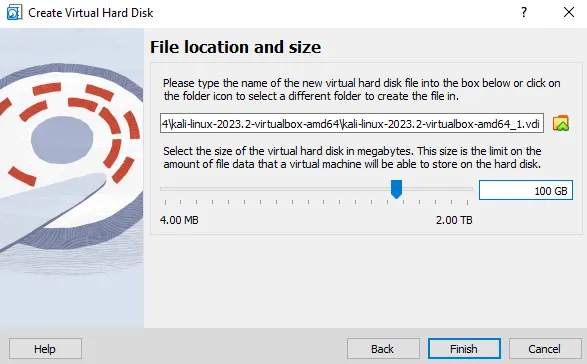
Create a new hard disk to collect the storage of the forensic image
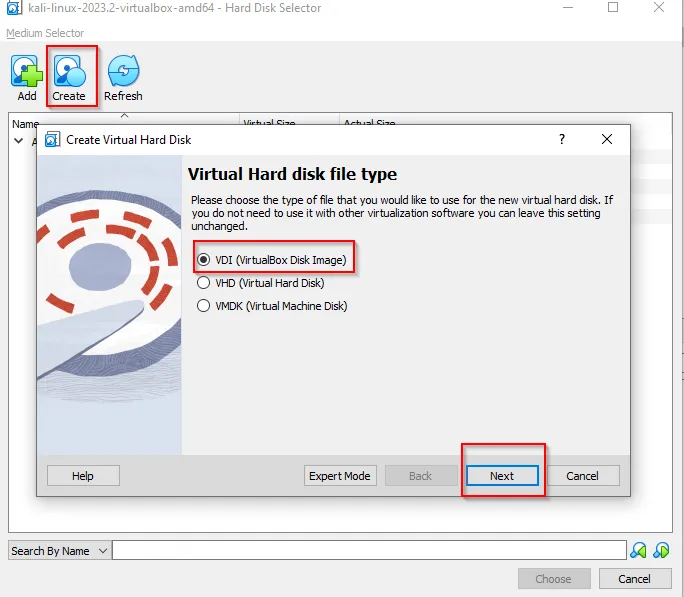
Choose the default option and further assign the container for storing the evidence. We here assign the storage of 100 GB as Evidence Storage.
Further
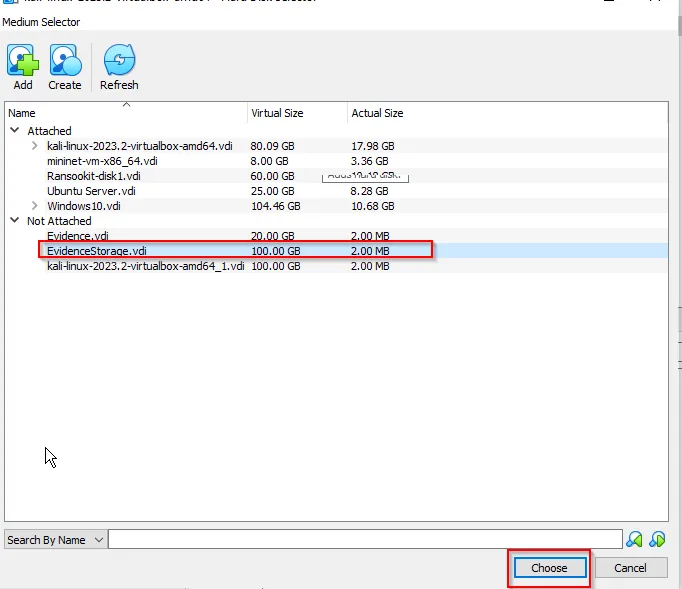
Choose this storage:

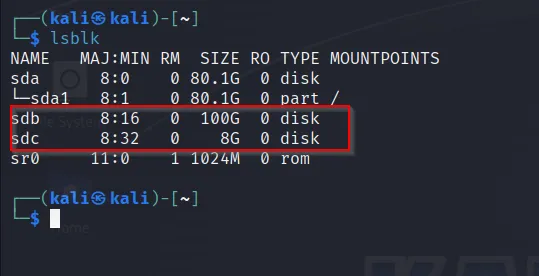
Creating an suspect drive for testing As like above, we will simulate another drive as suspect’s drive (or USB drive). The storage we assign will be around 8GB:

Now start the Linux device.
Looking into Linux OS
The created drive can be found as:
Tasks
Task 1: Preparing the Evidence Drive (Target)
Task 1: Preparing the Evidence Drive (Target)
Before you start the image acquisition process, you are required to prepare your storage environment and use a conventional way to store your evidence. Wipe your target drive, make sure it is clean for storing evidence. The reason this is done is to make sure there are no other files or material on the drive that might jeopardize your evidence. Remember, you may not be able to acquire data again, for various reasons!
To complete this task, we need you to do the following:
- Wipe your evidence storage (target drive) and format the drive with an Ext4 filesystem.
- Mount your evidence storage drive.
- Create a proper directory structure for your evidence, and use conventional naming for evidence that will be acquired
→ To clean the evidence, we will use dd command. Due to 100GB storage, it may take lots of time, so we will try to wipe the storage about 32GB as the evidence is only 8GB of size.

Here, we can see that our evidence storage drive is cleaning with 32GB. It may takes time.
The filter used on the command:
bs ⇒ Block size (512 bytes). It means the block size will be 512 bytes per block.
count ⇒ It means (3210241024*1024/512) data will be erased with each 512 bytes of block size ; which will be 32GB

Before formatting the drive with ext4 extension, we need to prepare it for storing the evidence. So we need to make partition for the disk. It can be done using fdisk command. We can use default command. (First enter ‘n’ and just enter default; at last enter ‘w’ to make partition)

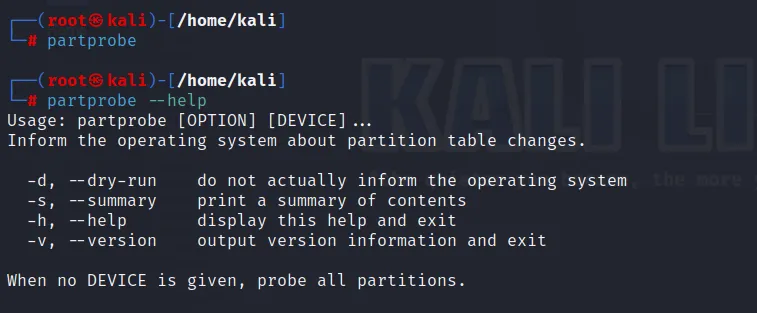
Further to let the Linux kernel about changes done for partition use partprobe command.
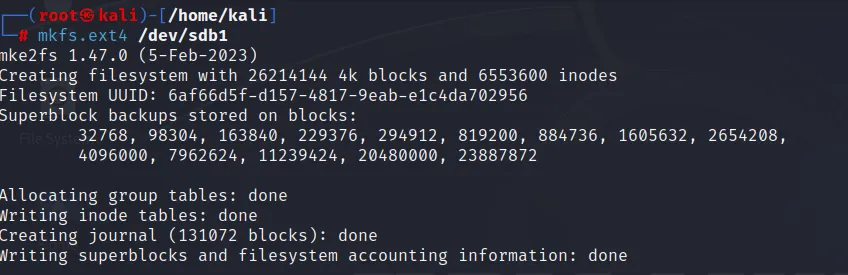
Now we create a ext4 filesystem for our newly created partition.
We should umount the partition if it is currently mounted. But our drive is not mounted, so we can do the following as:
mkfs.ext4 /dev/sdb1 (As sdb1 is created after partition)
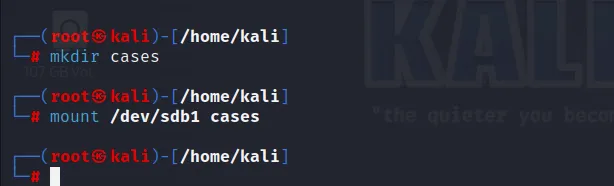
Mount the partition so that we can store our evidence.
After a mounting is done there is file “lost+found”
Let’s prepare our directory to store the evidence with proper hierarchy:
case → case003 →Disk1 →Images→Part1
Now, goto Disk1 directory and check what drive name and number has the Linux Kernel assigned for the evidence drive that we want to acquire. This can be done using “dmesg” command:
dmesg | grep sd | tee disk1_img.tx

The tee command will also create a file which stores the output of above command
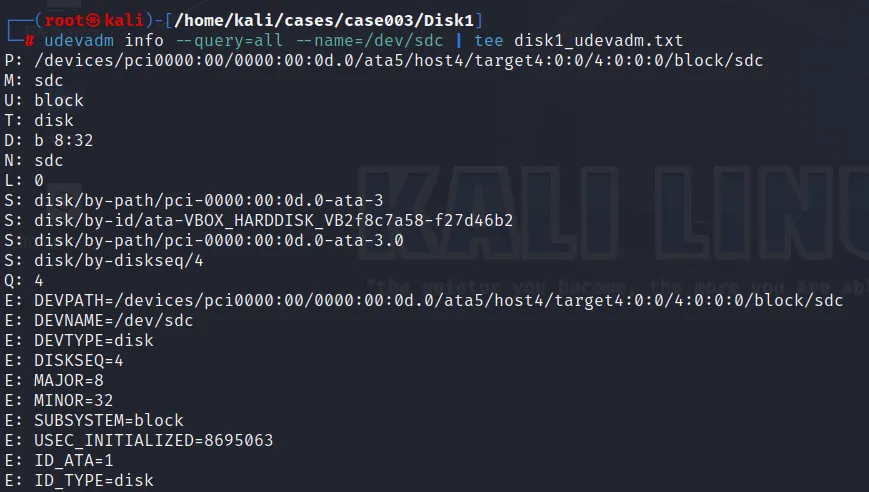
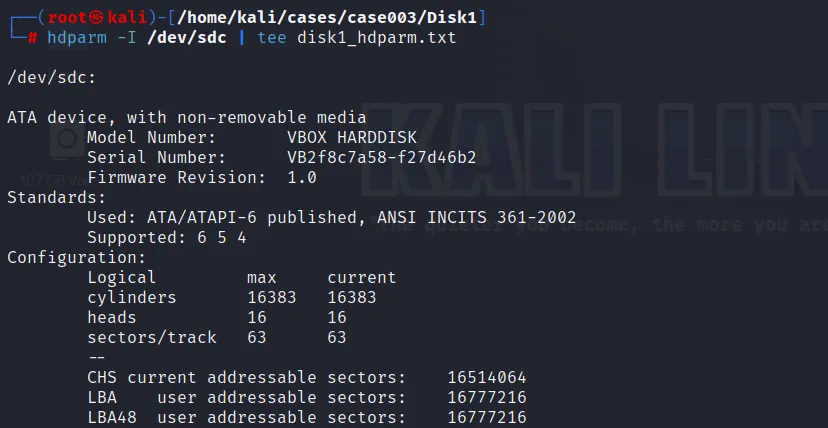
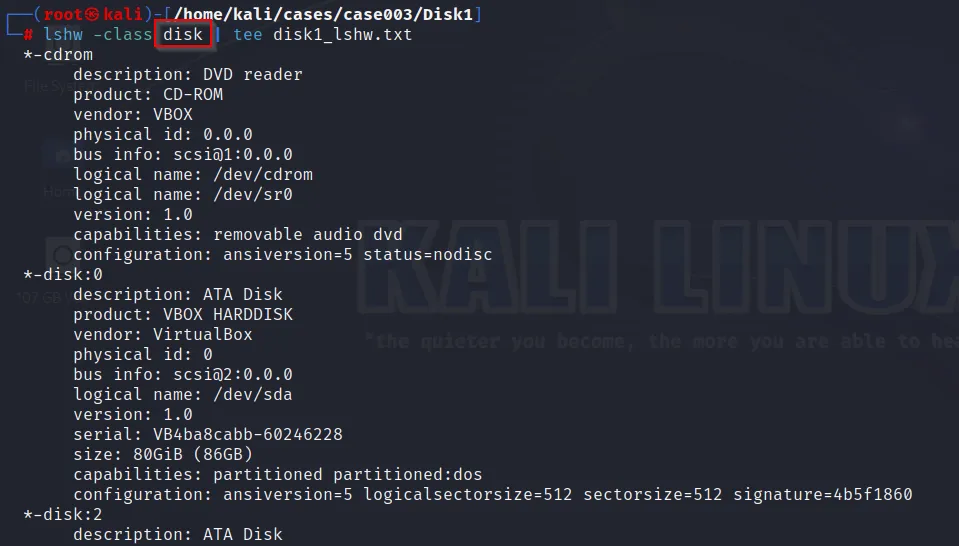
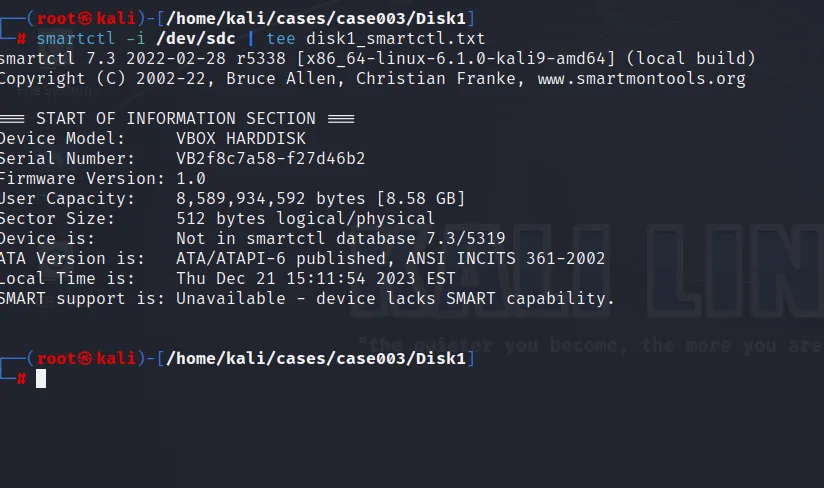
Let’s gather some information about the hard disk drive we are dealing with. This can be done using the commands like: udevadm, hdparm, lshw and smartctl.
-
udevadm (udev management tool)
-
hdparm
-
lshw(Hardware Lister) [Not installed by Default]
-
smartctl
And this is how we have completed our first task.
Task 2: Hashing Files and Drives
In this task, we assume you have already prepared your evidence storage, and it is now time to start gathering information related to the case. One of the most important parts in data acquisition is hashing. Hashing will be used later on for evidence validation. Don’t take this task lightly; your evidence might not be admissible in court because they could not be validated!
You are required to store the hash value for any evidence you acquire and add it to the directory used for this case (assuming it is case #1), this includes the hash value for the attached drive and the forensic image taken.
Please note that some tools like the ones we saw in the FTK Imager lab, generate this information automatically for you, while others embed this information as metadata with the forensic image itself. It is your responsibility to make sure such information is available, so make sure it is found with your evidence.
Solution:
To create a hash file we can easily use md5sum command from the terminal. The hash file are stored within another text file disk1_md5sum.txt
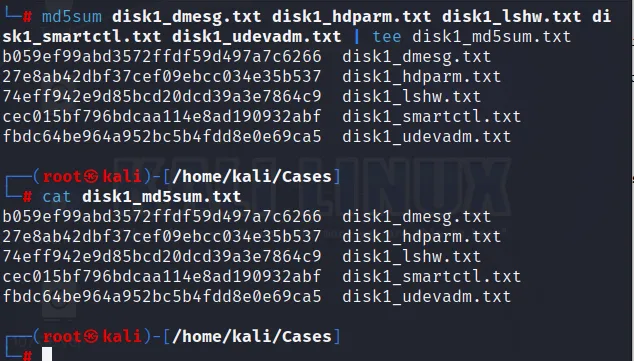
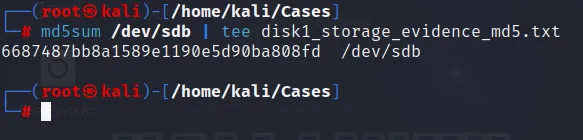
Similarly, The hash file of storage disk drive can be done and this might take some time:
Task 3: Imaging a Disk Drive with dd
In this lab, you are required to acquire a forensically sound image of a hard disk drive using the Linux “dd” command. Please be careful when using the options “if=” and “of=.” Using them incorrectly could destroy the whole evidence or even worse, destroy your whole evidence storage!!!
After finishing the acquisition process, don’t forget to hash the complete image and compare it with the hash of the drive you got from the previous task.
Solution:
Firstly we create a proper location to copy the forensic image of the suspect’s disk drive. Further we will use “dd” command to copy the suspect disk drive to our storage location.
from above command we need to understand:
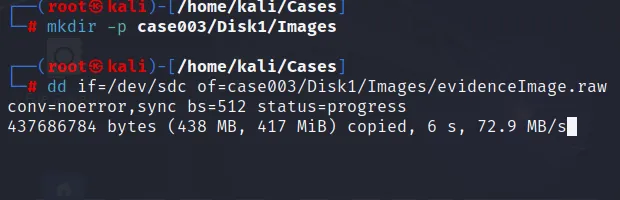
conv → This command is used to continue reading the storage even though the error occur. The “sync” filter is used to pad or concat the byte with value 0x00. If this option is not set, it will mess up the result.
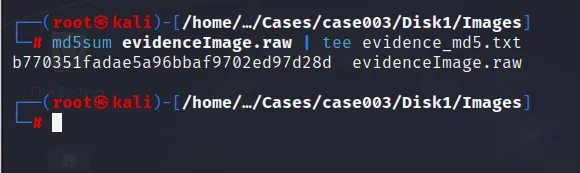
After the completion, we must make sure that the content is not changed, which means Hash value must be generated and saved for integrity.
Task 4: Imaging a Single Partition with dd
In this lab you are required to acquire a forensically sound image of a single partition instead of a full disk, also using the Linux “dd” command. You need to be aware of the offset of the partition in order to complete this task successfully. Use the “dd” man page to assist you with the options needed to fulfill this task.
After finishing the acquisition process, don’t forget to hash the image and compare it with the hash of the partition.
Solution:
Despite, using single whole forensic of an image, we can use the partition of the image. For that, we must ensure that the suspect drive contain partitions.
Here, for the disk we don’t have a partition. So, I’m creating a new one:
fdisk /dev/sdc
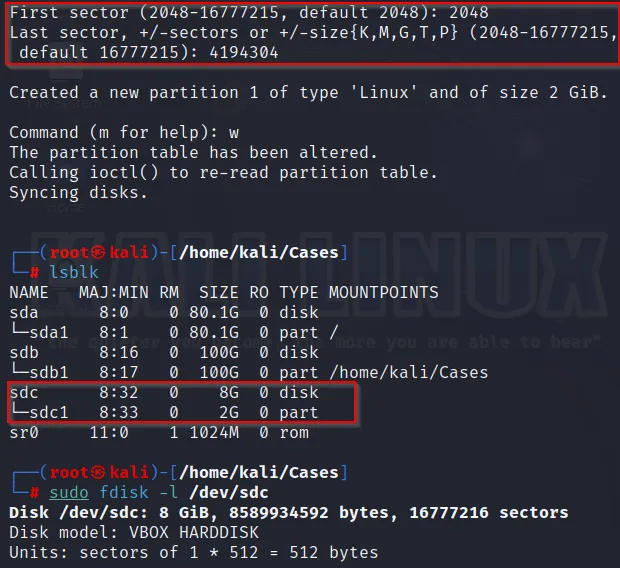
The sector we choose for partition is obtained by calculation, as above in the Task 1.
When viewing the disk:
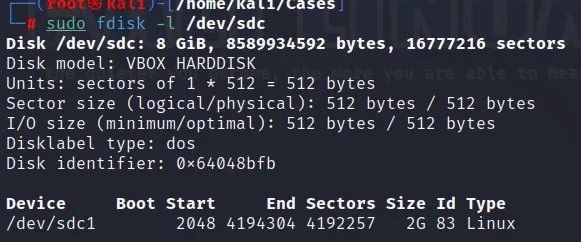
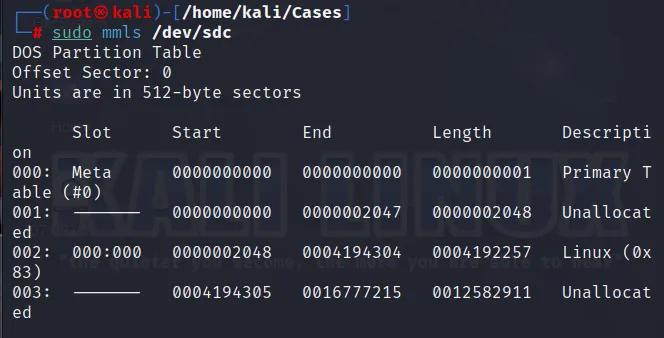
We also have another command to view the partition of the disk
mmls (Display the partition layout of a volume system)
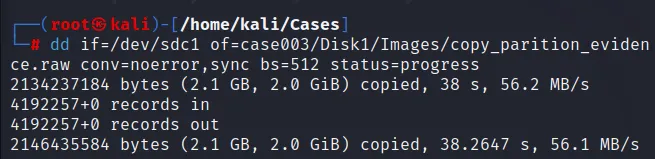
Time for storing the forensic image within our evidence storage drive. This can be done using “dd” command
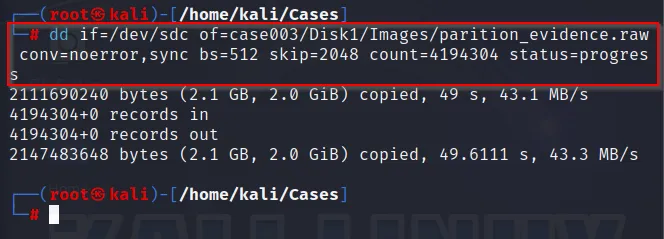
Understand that the skip filter is used to skip 2048 blocks of data and count is used to copy the amount of blocks i.e 4194304. This it as the blocks between (2048 and 4194304)
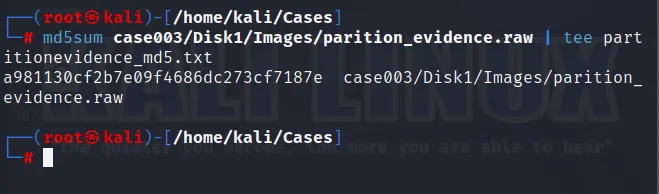
As the evidence is copied within the storage, we need to generate the hash file for integrity.
Also, it can be done similar to above as:
dd if=/dev/sdc1 of=cases003/Disk1/Images/partition_evidence.raw conv=noerror,sync bs=512 status=progress
If we generate the hash value for this copy evidence of partition:

This shows, the hash generate will be different for both the same file.

We need to make same hash file for both files. This can be done as:
md5sum <evidece.raw>= <evidence2.raw>
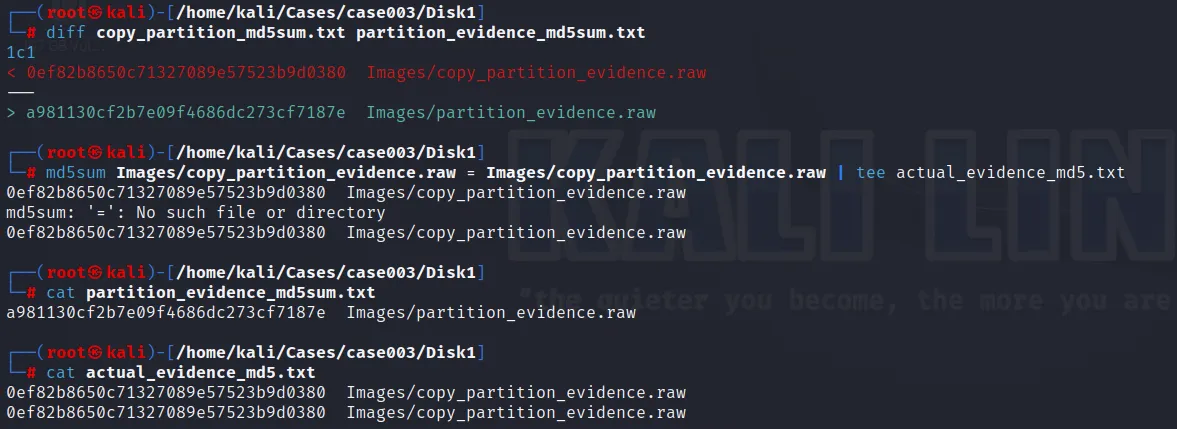
Error:→ The md5sum for both the same drive seems different, this is due to improper use of “dd” command.
Let’s again make a new partition (of 2GB) and make hash of that existing drive:

Copying the forensic image of “sdb2” within our evidence storage and computing the hash
But we need the filter for skip and count field, where we can take help of
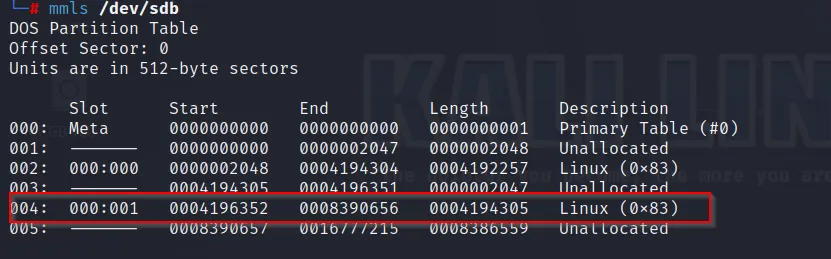
Here skip =4196352 and count=4194305
We will use the command as:
dd if=/dev/sdb of=new_evidence.raw bs=512 skip=4196352 count=4194305 bs=512 conv=noerror,sync status=progress
Similarly, for the same drive we can use the command as:
dd if=/dev/sdb2 of=copy_new_evidence.raw bs=512 conv=noerror,sync status=progress
When we generate hash file for both the drive, we will get the same hash file.
To demonstrate this example:
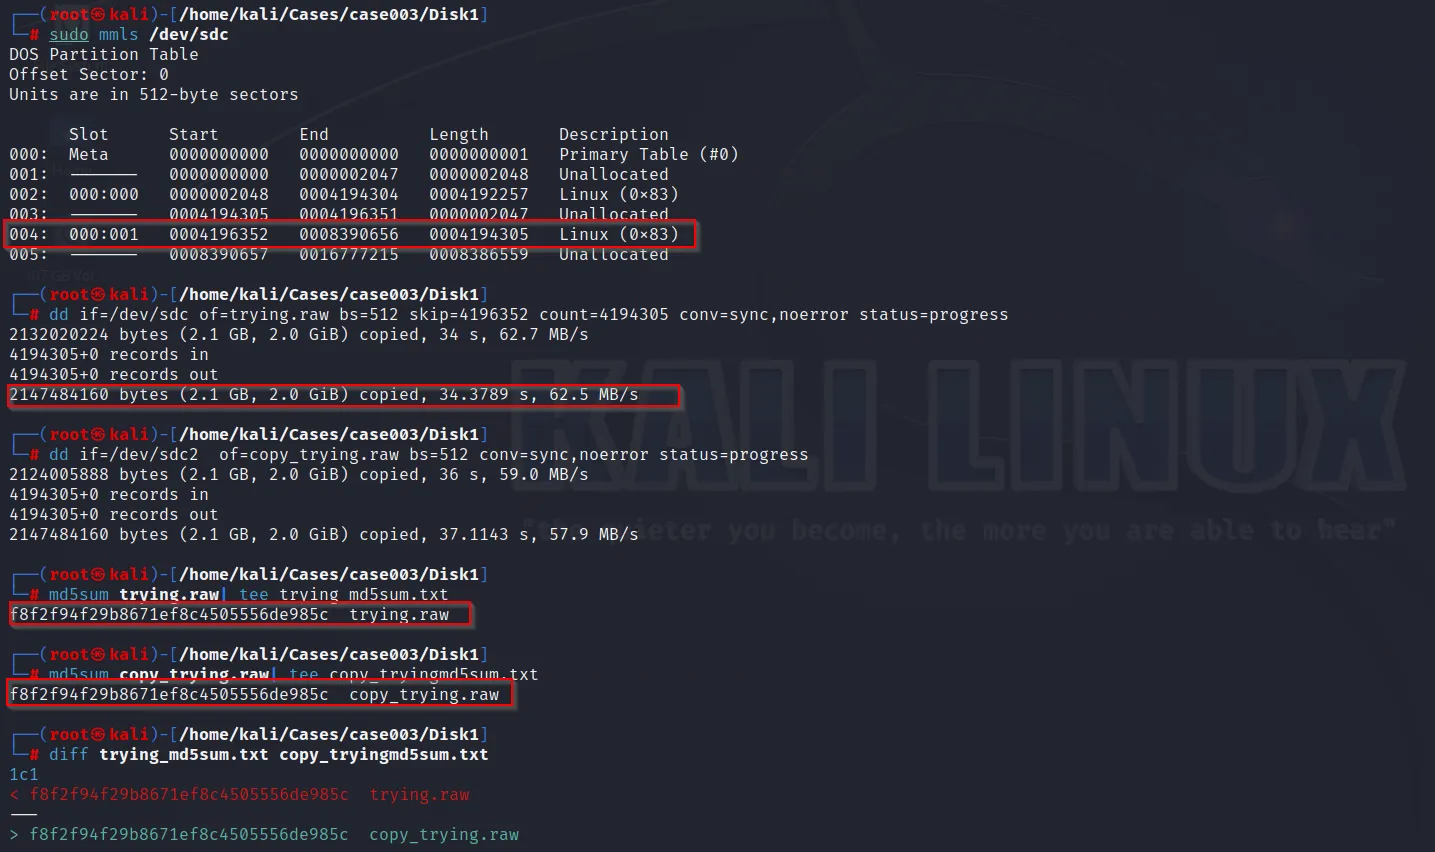
Hence we can see that, both the drive will have same hash value.
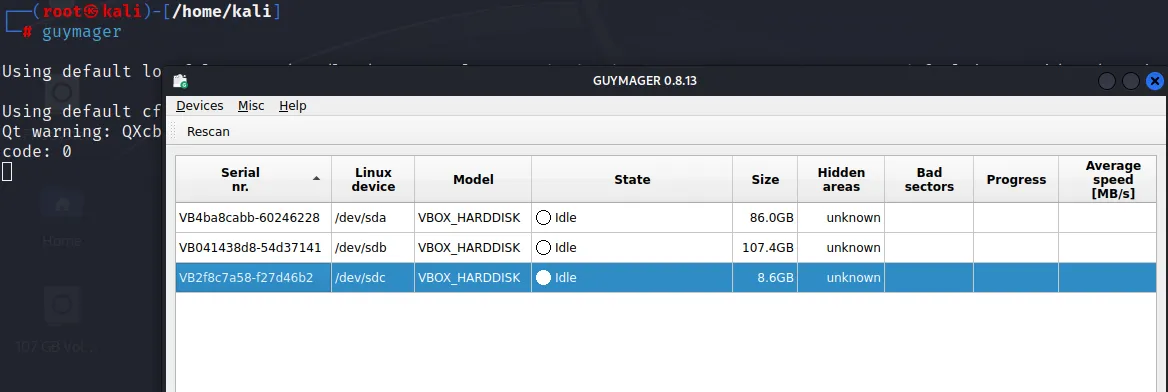
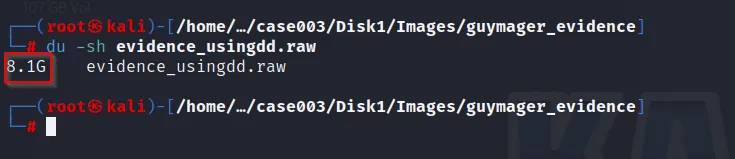
Task 5: Imaging a Disk Drive with GuyMager
In this lab, you are required to do the same acquisition you did in task 3 to acquire a forensically sound image of a hard disk drive, but this time using Guy Voncken’s forensic imaging tool named “Guymager.” The tool only works under Linux and is found in most digital forensics or penetration testing distributions. The tool can generate flat (dd), EWF (E01) and AFF images, plus the support of disk cloning.
You are required to perform the following:
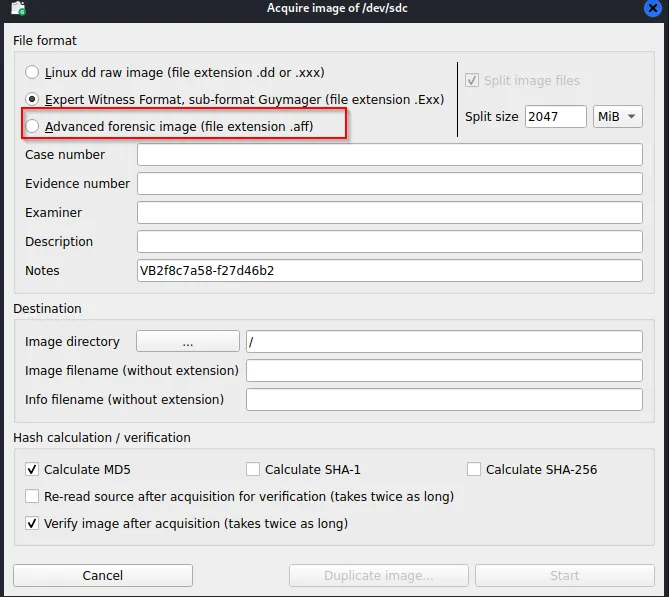
- Forensically image the disk drive using the Expert Witness Format (EWF).
- Configure Guymager to support the Advanced Forensics Format (AFF), and then take a forensic image using this format.
- Understand why you don’t need to hash the forensic images when using GuyMager.
- Check the metadata files generated with each forensic image.
- Compare the size of each image acquired, and compare them with the “dd” raw image you created in Task 3.
Solution:
Guymager is found default installed within most of the Linux distro. Access it with root previlege
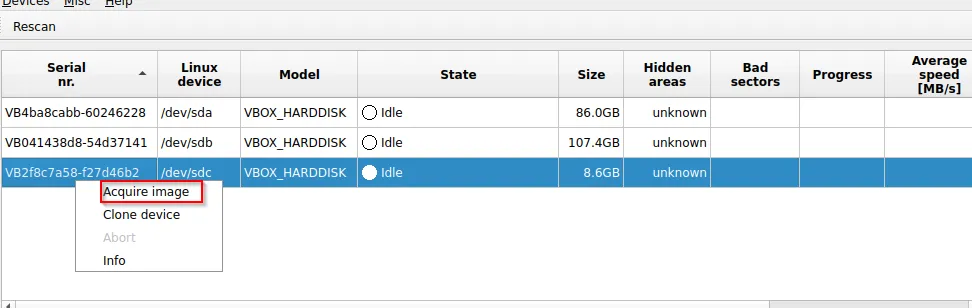
Right click on the evidence disk drive (Here: /dev/sdc) and acquire the image
Enter the detail information
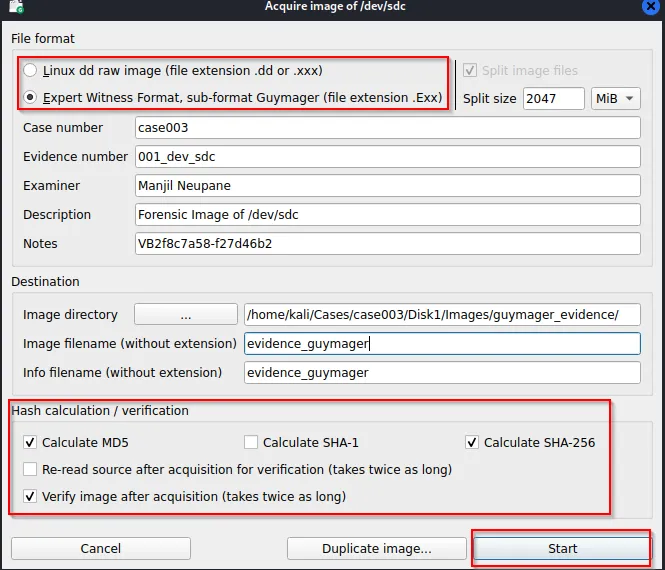
Start to acquire an evidence within the specified location

Within certain interval image is acquired
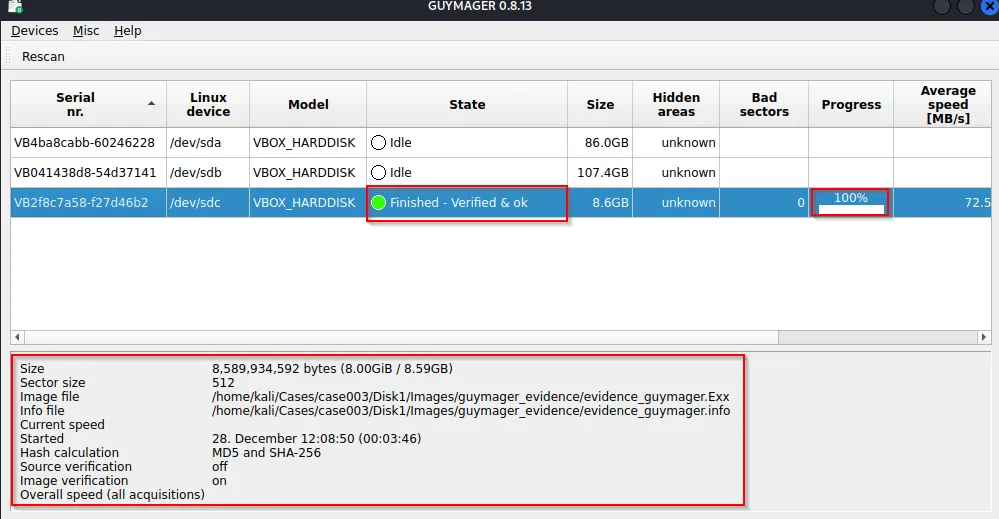
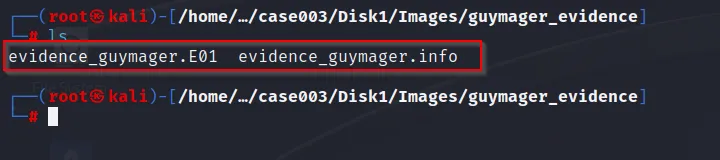
Locating the created evidence, two files are created.
(Note: While using “GuyMager” we doesn’t see the option for selection AFF formatted image because it is disabled by default. So we need to enable it from its config file)
(/etc/guymager/guymager.cfg)
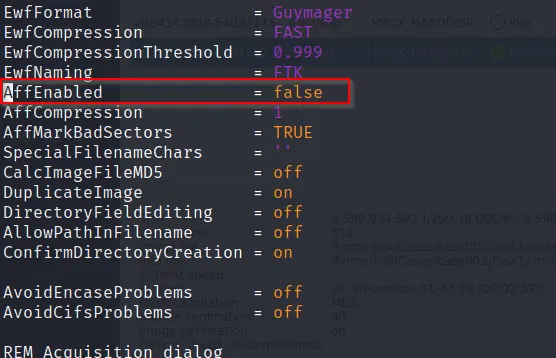
Set AffEnabled ⇒ true
Now again, restart the “Guymager” it will show the option for AFF format as:
Furthermore, we can extract the image as like above solution.
Task 6: Copying to CD/DVDs
is too big to be incorporated within a CD nor a DVD. The solution would be to try to compress and split the forensic image file. Using basic Linux tools, you are required to compress and split the forensic image acquired in previous tasks to be handled by a 700MB CD.
Don’t forget to hash your final file results.
Solution:
We will require a command to compress the image and split it into 700MB size so that it can be stored within the CD or DVD. This can be done using “gzip” command. Let’s take the raw evidence we just created on Task 4.
So we got the raw image with 8GB of size :
We gonna use this raw image by compressing and splitting into 700MB size so that it will be possible to store within the CD or DVD. Command is used as:
gzip -c evidence_image.raw | split -d -b 699M - evidence_image.raw.
Don’t forgot to include (.) full-stop at the end of raw
gzip → It will compress the image
split → It will use to split the compress image based on condition
-d  → It will provide the suffix in numerical format as: (evidence_image.raw.00, evidence_image.raw.01 etc)
-b → It will put size bytes per output file.
Don’t forget (-) dash before raw image
After using this command we will get just a single image as:

As we have split based on 700MB, and due to gzip the file is compressed in such a way that only one split file can be obtained.
But when we split the same zipped file with about 20MB then we get the multiple files as:

Further calculating the hash of those files:

What if we want to restore those split image evidence back to its original format,
cat new_testing.* | gunzip - > new_testing_copy.raw
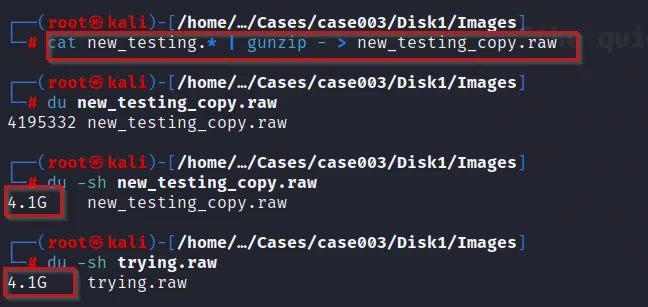
Furthermore, to make sure they are the same file, we can calculate their hash:
This confirms that we can restore the image evidence.
And this completes our lab 😀